Revised Workshop Schedule: September – October, 2015

Unknown

Great News!! We have revamped our workshop to provide a more intimate experience as well as make it more affordable. Going forward, our workshops will be held at our shop and seating will be limited to a maximum of five. As you will see from the revised schedule below, this will enable us to put on more workshops, and moving it to the evening will make it easier for many people to attend.  We hope you are as excited as we are and look forward to hearing from all of you.

This is a workshop for all skill levels.  Whether you are a beginner who wants to learn to use Annie Sloan’s fantastic products, or a more experienced painter who wants to learn new finishes, you will benefit from this class.  We teach three finishes: Two Color Distressed, Wash, and Crackle.  You will also learn how to properly apply both clear and dark wax to create a wonderful satin finish on your pieces.  The price is $95.00 and that includes all supplies and lunch.  Come and join us for a fun day of painting and learn techniques you can use to transform your home.

Workshop time:  6:00PM- 9:00PM

Current Schedule:

September 28,2015

October 26, 2015

November (to be announced)

DSCN1574

Tick Tock Paint A Clock {mini workshop}…

We are so excited about our upcoming workshop…

Tick Tock Paint A Clock Single

Inspired by this Before & After…

IMG_3346And the overwhelming response we’ve had to the clock since we had it

at The Fancy Flea this April & now at The Black Swan Bazaar Too

IMG_4185Space for this workshop is very limited!

painting fabric {why, yes you can}…

So I’ve been anxious to try painting fabric with Chalk Paint® Decorative Paint by Annie Sloan since getting in her Color Recipes for Painted Furniture book {so worth the small investment, you should pick one up}. I decided to start with a couple small projects before diving right into the fabulous old chair we have down at the warehouse.

You will need…

-Your piece

-Chalk Paint®

-Clear Wax

-Brushes for painting

-Brushes for waxing

-Cup/Water

-Clean, dry, lint-free rags

-Artist brushes for any details you’re planning

-Paint can opener {or trusty old spoon}

Note: You may need additional supplies depending on the details you choose to do.

I was so excited to get everything gathered & get started that the only before picture I got was with my iPhone & I didn’t get a good photo of the blemish on the stool that I was hoping to cover {if you enlarge the photo, you can see it on the right hand corner}.

photo copy 2

I ended up putting three coats on the upholstery because I wanted really solid coverage & wanted to cover the spot on the upholstery. I used Chalk Paint® in Aubusson Blue on the upholstery & put a nice base coat of Aubusson Blue on the stool base.

IMG_2181

I am very pleased with how the Chalk Paint® is masking the blemish on the fabric after only two coats! If I was not pointing it out, it isn’t noticable at all.

IMG_2182

After painting the fabric with three coats and letting it dry overnight, I applied a coat of Clear Wax working it in with the brush & wiped it clean with a clean cloth.

IMG_2183

IMG_2184

On the base of the stool I added Chalk Paint® in Paris Grey over the Aubusson Blue, distressed it lightly and used clear & dark wax. Below you’ll see that blemish on the upholstery was covered beautifully… very pleased!

IMG_2188

IMG_2190

Below is the magazine storage that was originally a pattern of several shades of green {see it in the shadows of my Awesome “before” photo?}. I gave it two coats of Chalk Paint® in French Linen & a little freehanded detail in Duck Egg Blue.

After painting the fabric with two coats and letting it dry overnight, I applied a coat of Clear Wax working it in with the brush & wiped it clean with a clean cloth.

IMG_2186

Perfect for holding all of our books written by Annie Sloan. Keep this project in mind when you’re out shopping… you can almost always find these magazine storage boxes in random colors/patterns discounted to almost nothing. See past their color! You could even buy mismatched shapes or styles & paint them to coordinate! The possibilities are endless with Chalk Paint®!

IMG_2185

Love how these two little projects turned out & can’t wait to get started on the chair at the warehouse!!!

IMG_2187

You owe it to yourself to explore the possibilities of Chalk Paint® & fabric… send us photos of your before & afters!!!

Mirror, Mirror {Repurposing Vanity & Dresser Mirrors}…

So often we overlook pieces we already have or things we find while we’re out treasure hunting because they aren’t in their original condition or being used as they were originally intended. Mirrors are often removed from dressers as people move or redecorate; sometimes they’re never reattached because hardware is lost, maybe a dresser is repurposed as a buffet or the piece is put under a window where the mirror would block it. Sometimes they’re simply removed because of the condition of the mirror.

Mirrors brighten & add depth to small spaces and some of these pieces have incredible detail that you’re just not going to find on most new mirrors.

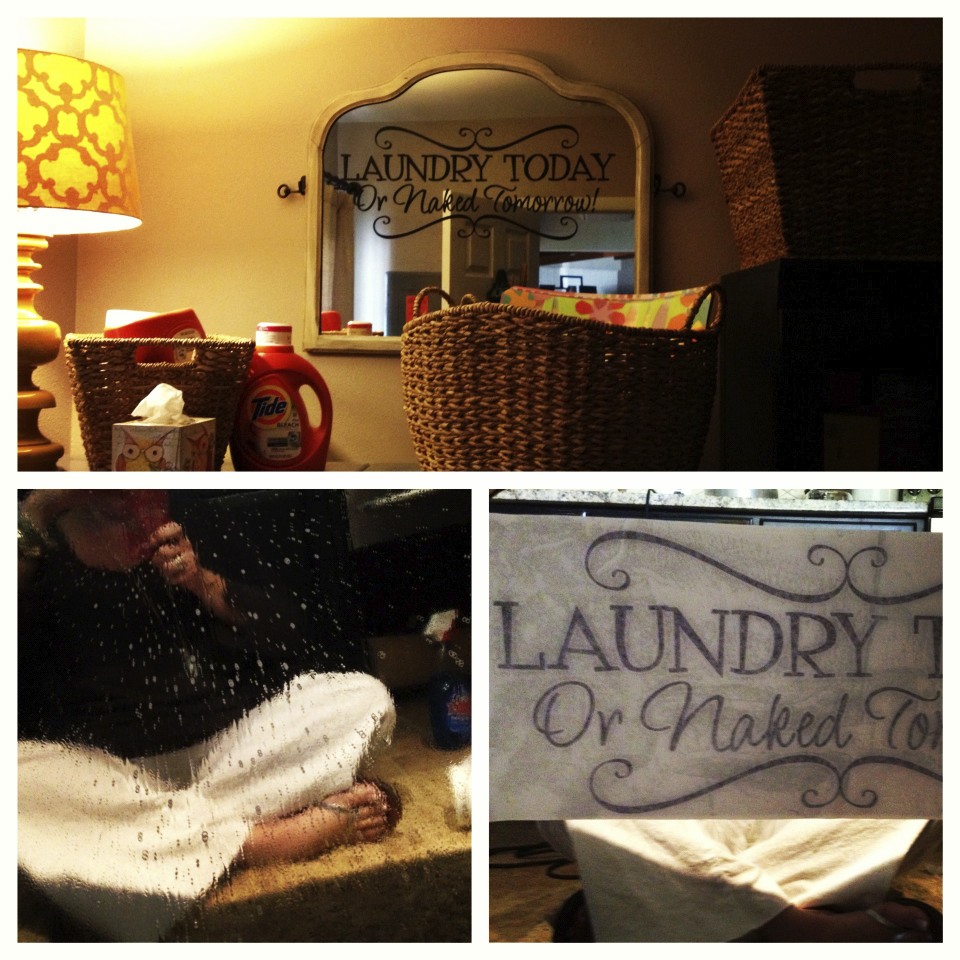
This dresser mirror had been in my garage for 16 years… yes, 16 sweet years {overlooked in the shadows of treasures coming & going, just waiting to be rescued}! Below, it has been revived with a little Chalk Paint® decorative paint by Annie Sloan in Versailles under Old Ochre, a little light distressing to reveal the Versailles & some Annie Sloan Clear & Dark Wax.

I left the original hardware on the sides that would have held it in it’s frame allowing it to pivot, went to my local hardware store and purchased two simple iron hooks for it to rest on. Simple enough!

Since I wanted something to lighten up laundry days, I added this fun vinyl. This could also be done with an artist brush & any Chalk Paint®. And, the great thing about either option is that they can be removed allowing me to put this mirror anywhere in my home.

There were so many possibilities with this mirror, but absolutely love it in the laundry room. I think it would have been a beautiful addition to any room in our home just as a mirror or with a large vinyl or painted monogram. Maybe in one of the bathrooms over the vanity/sink. I could have easily painted the mirror with Chalk Paint® in Graphite or any other color & used it as a chalkboard. Chalk Paint® is Not chalkboard paint, but because of it’s incredible texture it takes chalk very well. Over time, any area that you write on will need to be re-painted.

IMG_2003

Your vinyl will come with directions {follow them closely}. I always like to have on hand… Windex, paper towels, painter’s tape, my trusty level app and vinyl applicator or debit card.

IMG_1996

Once you’ve positioned your vinyl, work out any bubbles with your vinyl applicator.

IMG_1999

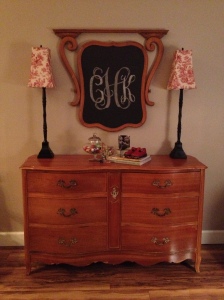
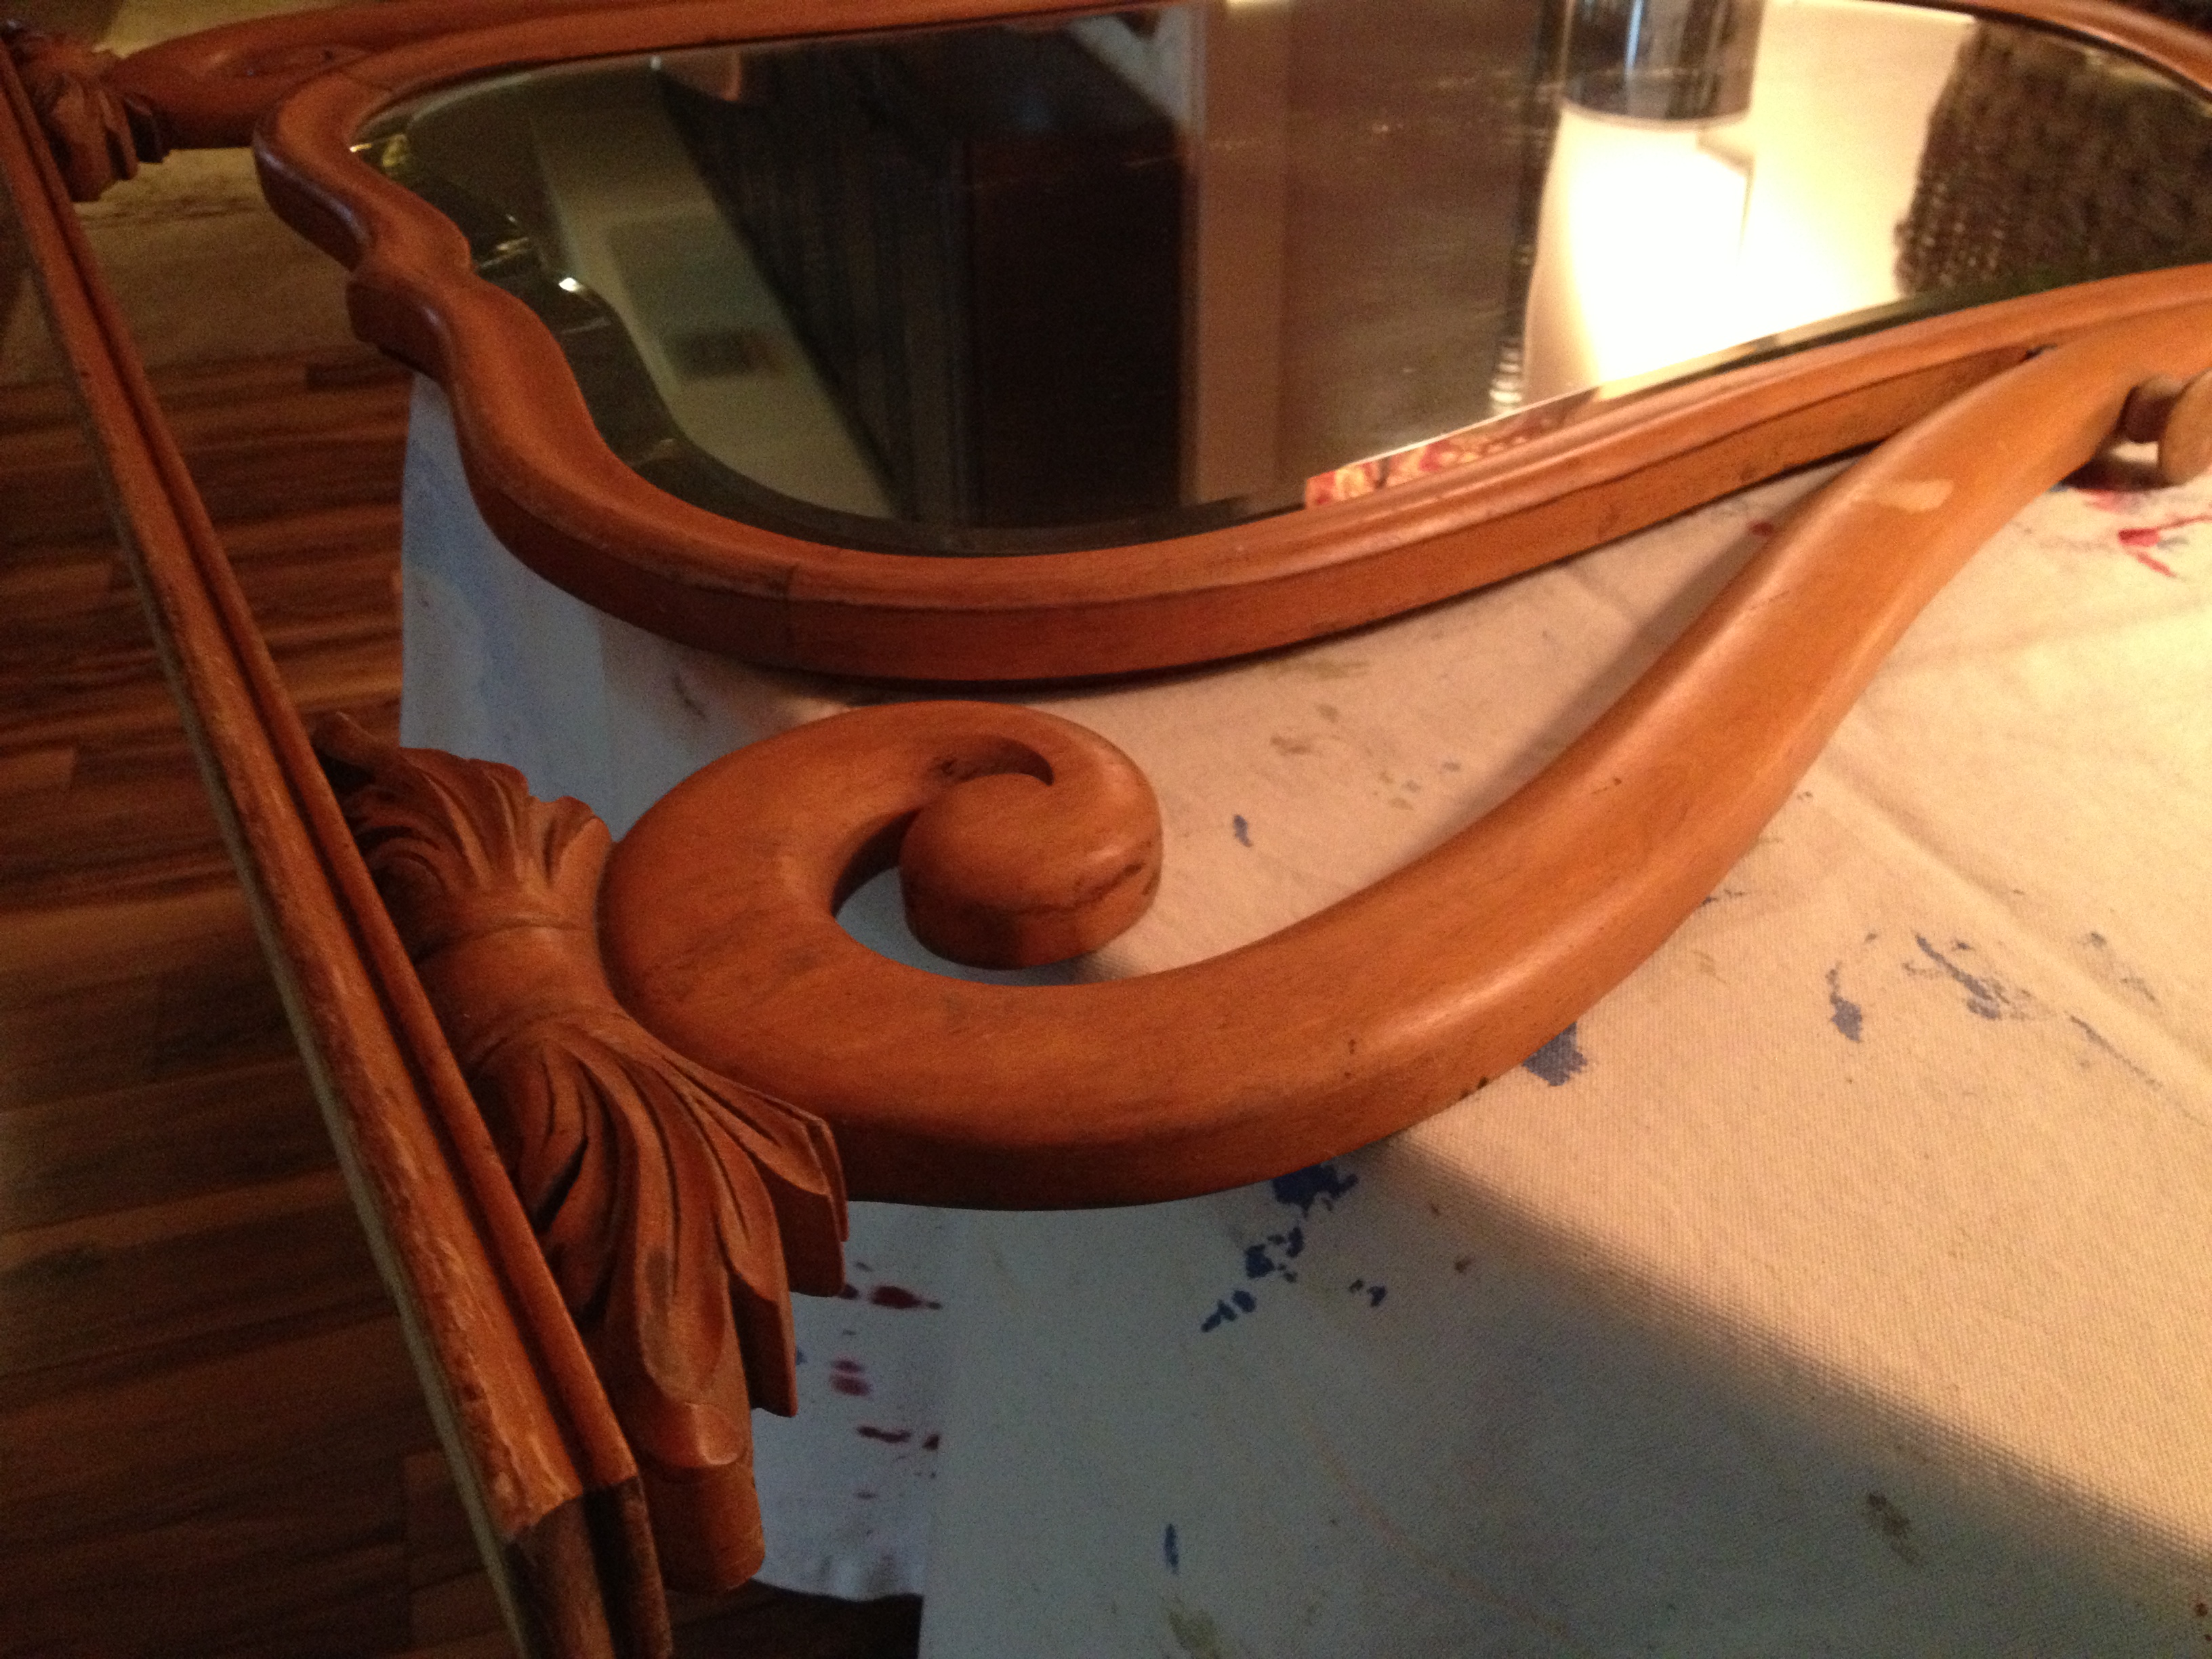
This gorgeous mirror was rescued from a storage trailer along with the dresser. I knew from the moment I saw them in all their dust & dirt glory that they would not remain together {insert the gasp from all the purists}. The dresser was scaled perfectly for me to paint the Union Jack, done in Chalk Paint® Napoleonic Blue, Pure White & Emperor’s Silk {maybe another post for another day}.

photo copy 6

I absolutely loved how this cleaned up, so I didn’t paint the frame. But, years of being in an open storage trailer out on someone’s property in our ever humid Florida… definitely took a toll on the condition of the mirror itself {excuse my light fixture reflecting in the mirror}, so I decided to paint it with Chalk Paint® in Graphite & monogram it with chalk.

If you’re going to be using something as an actual chalkboard, apply three coats and Do Not wax. Remember also, you can use any of the Chalk Paint® colors to create a fabulous chalkboard!

photo copy

If you’re as impatient as me, this will be the hardest part of this project… Yes, Watching the paint dry!

photo copy 5

While I was waiting on paint to dry… I knew I wanted a fabulous monogram on it, so I headed on over to For Chic Sake to create a customized printable monogram to project onto my mirror turned chalkboard so I could chalk it. Some projects I freehand, but this one I wanted crisp &  beautiful. I wanted a statement piece.

a32198e7e69ecc2276b90a0966b4f23b

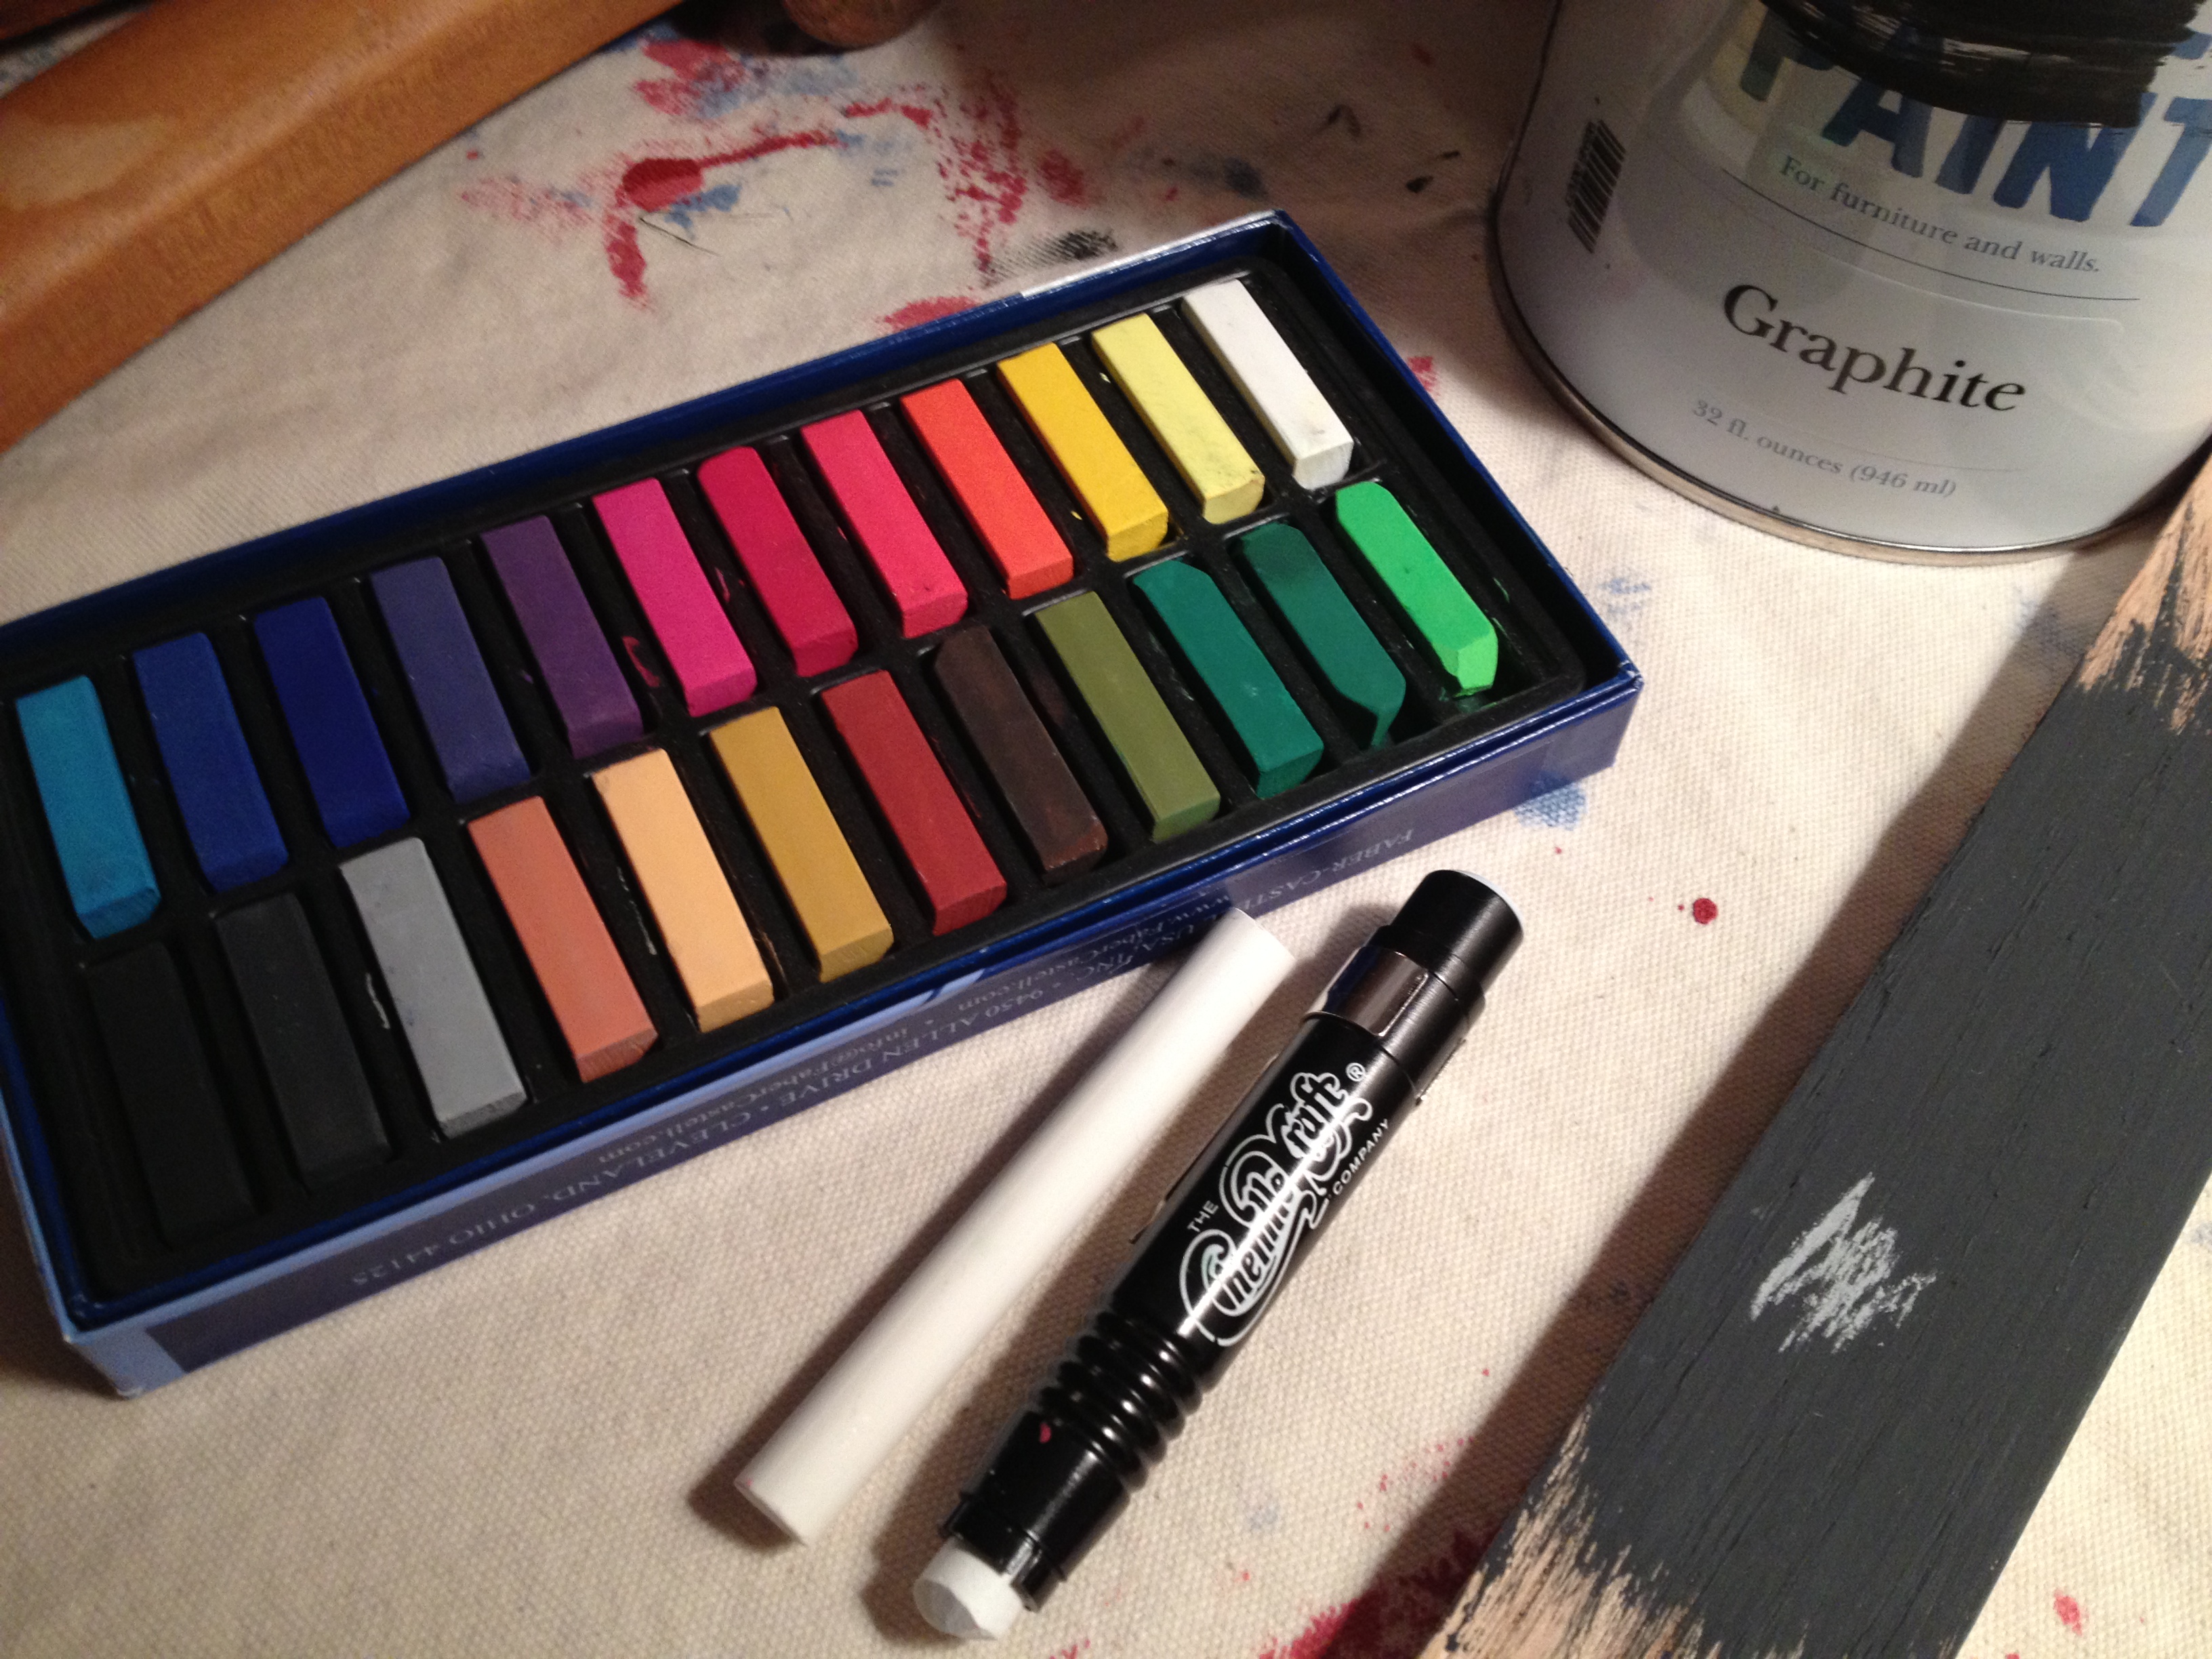
Not only do I love Chalk Paint®… I Love Chalk! Pick up a pack of artist chalk at your local craft supply store; it’s a little more expensive, but so easy to work with & love the colors! I also use plain white chalk & a chalk holder from the local teacher’s supply store. The chalk holder is worth the small investment, as it keeps the chalk from breaking {not necessary, but worth it}.

Any time I’m going to use a colored chalk, I like to test it out on a sample board. I knew that I wanted the primary initial to be this sophisticated grey, but still tried it out on my sample before moving forward. This color reminds me of Annie Sloan’s Paris Grey. The two smaller initials are done in white, reminding me of Annie Sloan’s Pure White. For something more permanent, the monogram could have been painted using these colors.

photo copy 4

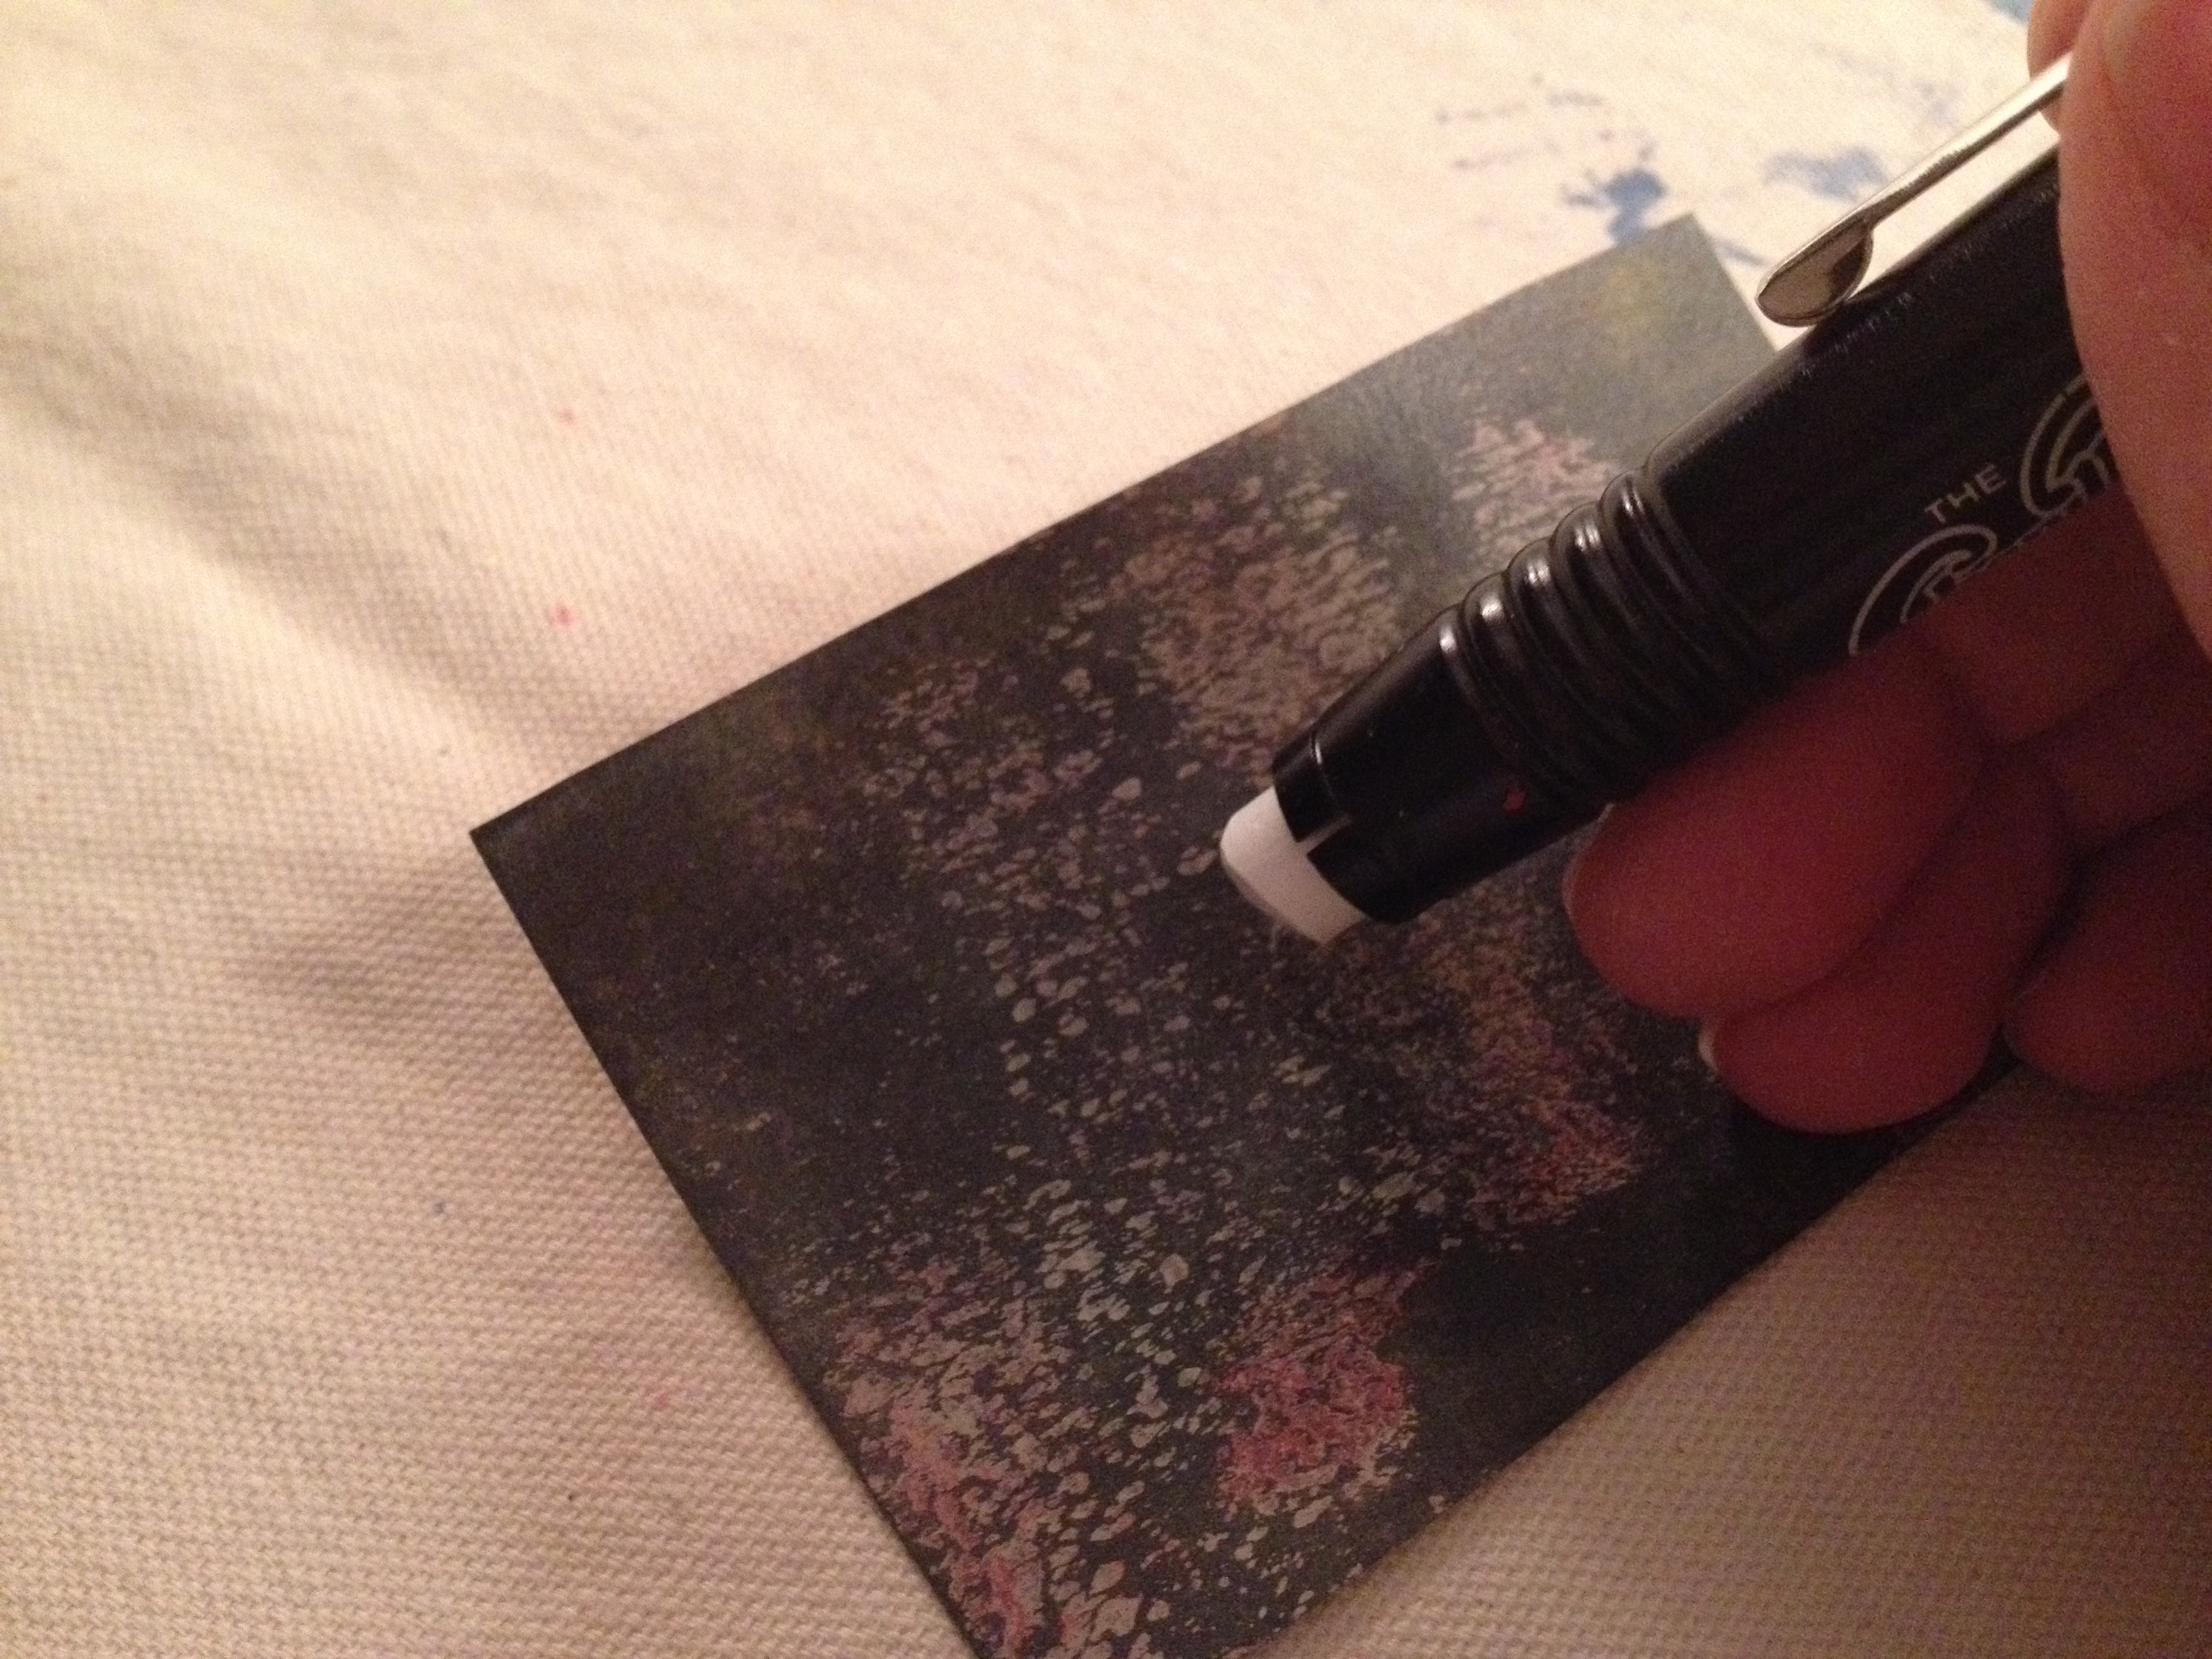
Whenever I’m using chalk, I keep sandpaper at hand. Occassionally there will be like a little grit that will feel like a drag or scratching against your piece. Just stop & run the chalk across the sandpaper to remove the grit. I also like to use the sandpaper to create sharp edges if needed, so I can get really straight lines.

photo copy 2

And, the finished piece… tah dah… Love it! Now this is not the dresser that was rescued with the mirror turned chalkboard, but I think they look gorgeous together!

photo copy 3

Hope this has inspired you to go dig those forgotten mirrors out of your garage. If it has, send us photos of your Before & Afters! Of course, include the details of what you did in your transformation!

Washing, Cutting & Giving Burlap Purpose {A Table Runner “How To”}…

What You Will Need for This Project…

  1. Your favorite Chalk Paint® Decorative Paint by Annie Sloan
  2. Annie Sloan Clear Wax
  3. Stencil & Stenciling Brush
  4. Clean Rag
  5. Burlap {I used 3 yards for my table, measure for your needs}
  6. Embroidery Thread & Large Needle
  7. Scissors
  8. Iron & Ironing Board
  9. Detergent & Bleach
  10. Painter’s Tape

IMG_2125

How I Wash Burlap…

I’ve tried a number of methods to wash burlap & really haven’t noticed any difference, so since I’m crazy impatient… I go with the Quick Wash, recommended amount/type of detergent for my washer & bleach. If there is still a chemical smell {which almost all burlap has}, I run it through another Quick Wash before drying.

If your project does’t call for paint, then add the recommended amount/type of liquid fabric softener to your wash.

Your burlap will look like this, but don’t worry it irons out easily on max setting. Some people prefer to hang dry their burlap… I prefer to dry it to help remove some of the lint.

IMG_2127

Be sure to remove this from your lint filter!

IMG_2132

So this is one step where “Quick” just doesn’t cut it! Slow & Steady wins the race!

Once you’ve determined the width you would like for your runner, slowly pull one thread from the burlap & then pull a second directly next to it. Remember… Slow & Steady!

If you rush, your thread will break!

IMG_2128

Once you’ve removed both threads, you will see a “scissor trail”… Cut directly down the center of it for the perfect burlap cut! Repeat this step on the other side & ends to even them up.

IMG_2129

Cut directly down the center of the  “scissor trail”.

IMG_2130

At this point, I was so excited about adding the red detail that I forgot to document the “fringe step”. Not to worry though; all you need to do is remove threads one at a time until you have your desired fringe length. Repeat this step, taking out the same number of threads on each side of your project.

IMG_2134

Once you’re ready for detail, determine the placement & weave your needle under/over pulling the thread through.

IMG_2135

After you’ve finished the threaded detail… It’s time for stenciling! Just place your stencil where you’re gonna love it & use a little tape to secure it. Do Not use Stencil Adhesive! I repeat… Do Not use Stencil Adhesive {said the voice from projects past}!

Load your stencil brush with a little of your favorite Chalk Paint® {I used Annie Sloan Pure White}, tap tap on a paper towel to remove any excess & tap tap in the stencil, reloading as you go to get the desired coverage {another step I did not document… where are the kids or the man when I need them to snap a photo of me “tap tapping”? lol}.

IMG_2136

Get a little bit of Annie Sloan Clear Wax on your rag, work it in & remove any excess as you go. Don’t worry… the wax Does Not make the burlap hard; it will be just as supple as the rest of the washed burlap.

IMG_2137

Now for the best part of this project… Add it to your space with a few of your favorite things, use it… Love it!

IMG_2138

The width of your average burlap will yield approximately three runners… Make a couple for friends while you’re at it!

IMG_2140

We would love to see what you make, so email us photos with all the details & you may see them posted here on the blog or our Facebook page!

Chalk Paint® Workshop Summer Schedule…

If you would like to learn about the many things you can do with Chalk Paint® decorative paint by Annie Sloan and Waxes, consider attending one of our fun and informative Chalk Paint® Workshops this summer. We currently have work shops scheduled for June 15, 2013, July 13, 2013 and August 10, 2013. We begin at 9:30AM and spend the next five hours teaching you how to create five different finishes as well as how to use both dark and light wax to achieve the effects you are looking for with these amazing products. A light lunch will be served. We are filling up fast, so either call 863-510-5980 or email blackswan.bazaar@yahoo.com and let us know if you plan to attend. The cost is $150.00 and that includes the workshop, lunch and all of the supplies you will need for the class.

Summer Sched

Chalk Paint® Workshop Jan 26

Below are some photos of the group of ladies who attended our Chalk Paint® Workshop last Saturday. We had so much fun…. there was a lot of laughing and a lot of painting. Annie Sloan products are so great to work with, and it becomes even more fun when you are working with a great group of people.

workshop 1

These ladies came ready to paint!!! Continue reading